I know for many of you, math is a four-letter word. In order for your projects to come out the right size and nice and flat, as well as being able to determine how much fabric to buy, you're gonna have to do a little bit of math. But relax - it's 3rd grade math, not calculus!! Having these formulas in your "toolbox" will allow you the freedom to plan and create any quilt in any size!
Let's start today with quilt blocks.
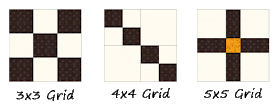
FACT: Most patchwork blocks are based on an evenly divisible grid. Can you visually see the even divisions in these quilt blocks?
When you hear the term "9-patch", this is a clue to the grid base used within the block. A 9-Patch block has nine patches - 3 across by 3 down, hence a 3x3 grid. If you are having trouble "seeing" the even divisions within a block, sketch it out and draw grid lines across it to determine the underlying base grid. In some blocks, the patches may span 2 or more grid spaces or a grid space may be made up of smaller patches, like the 4x4 "Double 4-Patch" block shown above. I don't want to complicate things at this point, but keep in mind that a 9-Patch block (on a 3x3 grid) does not always mean that there are 9 equal squares in the block. The UNITS of the block must equal 9 and be the same size. If you have any questions about this, just ask me!
Can you determine the GRID base for the following blocks?
 | |
| (1.) 6x6, (2.) 5x5, (3.) 4x4, (4.) 5x5, (5.) 4x4, (6.) 6x6, (7.) 5x5, (8.) 4x4 |
For example, if the black square in the first block is 2" finished, the entire block will finish at 6" (2" x 3 across = 6"). Change that black square to 3", and the finished block size is now 9" (3" x 3 across). Decrease it to 1-1/2" and now it's 4-1/2" finished (1.5" x 3 across).
Can you calculate the block sizes for the rest of the blocks shown above if the grid unit size is 2"? What about 3"? Here's a hint: Determine the underlying grid and multiply by the grid unit size.
Resizing Quilt Blocks
Once you have determined the grid base of a quilt block, you can resize the block by multiplying the grid by a new unit size, or by choosing a new finished size and dividing by the grid to create a new unit.
Huh? For example, look at the following block. The grid = 4x4, the small square = 2", and the finished size = 8".
To resize by the block by changing the Unit Size:
Grid x Unit Size = Block Size
What size will the block finish if the small squares are now 3"?
(Answer: 12" )
To resize by changing the Block Size:
Block Size / Grid = Unit Size
What size is the small square if the block now finished at 6"?
(Answer: 1-1/2")
Is your head spinning yet? Just keep thinking in the grid, and you'll be fine. But blocks are the basis of most quilts, and having the power to create blocks in any size (instead of what your pattern or book tells you) gives you the freedom to create whatever size quilt you want! Isn't that liberating?
If any of this isn't clear, just drop me a comment and I'll try to respond. Next week - calculating quilt sizes!
EDITED 3/5:
Cindy asked if I could provide the grid blocks with the actual grid overlaid on top of them. Please excuse my less than stellar drawing skills - but you should be able to see the blue lines on top of the quilt blocks.Rebecca asked on Facebook how to calculate sizes for blocks that don't fit the "square" mold of basic quilt blocks, like Tumblers.
Here's my smart-aleck answer....EQ7. I use Electric Quilt Software to draw basic blocks and rudimentary quilt layouts because it's faster than graph paper and EQ does the math for me. I probably use one-tenth of its total capabilities, but it saves me time and brain cells when I'm drafting a new quilt.
But for Tumblers, here's how you plan a quilt.
The height of the row is easy. It is based on the measurement of the tumbler from top to bottom. Multiply the height by the number of rows to get your finished length measurement.
Here's a diagram showing how to calculate the width of the row (drawn in EQ7, I might add....).
I hope this visual works - because I'm having difficulty describing in words. You can't take the width of the wide part and multiply by the number of total blocks in the row, because the angled part of the block next to it occupies the same "width space". But if you look at the diagram, and measure your finished tumbler as shown, you should get a ballpark measurement of 1 "block" width. You'll have to add on the width of half-blocks to make the edges straight, but you'll get fairly close enough to a finished width of a quilt by using this formula and multiplying by the total number of tumblers in row.


I love a good math lesson! thanks for the great info.
ReplyDeleteGreat info. Can you post your sample blocks with a grid drawn on them? It would make it easier to understand.
ReplyDeleteCindy - I'll see what I can do. My graphics skills are not so hot!!!
ReplyDeleteThat was extremely helpful!
ReplyDelete