Showing posts with label Lizzy House. Show all posts

Friday, July 15, 2011

1001 Peeps PDQ* Summer Throw

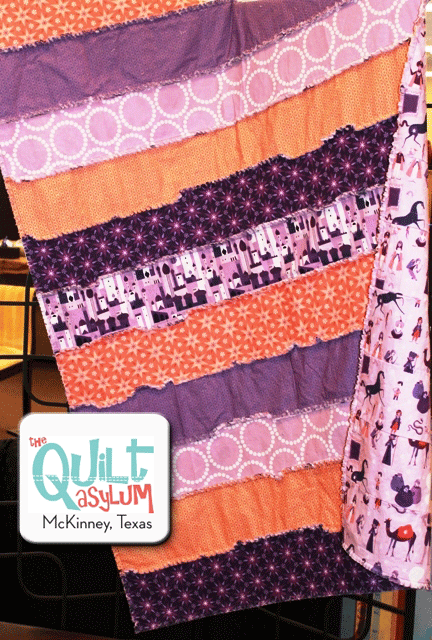
It's Friday!  So that must mean a new 1001 Peeps Summer Camp project!  This week I'd like to share with you our 1001 Peeps PDQ (*Pretty Darn Quick) Summer Throw!  This 40"x60" lightweight throw is fast and easy with fringed seams and is great for those cool camp nights or for chasing the chill of too much air-conditioning!  Summer Camp isn't any fun without a Mail Call - so I'll tell you about that after the tutorial.  Let's get started.

Materials Needed:
Back:   2 yards, cut crosswise into (12) 6"xWOF strips
Front:   1/3 yard cuts of 6 fabrics, cut into (12) 6"xWOF strips
Thread to match your fabric - it WILL show
Sharp scissors

 
Before cutting

After cutting
This throw has no batting; the front and back are pieced together in a "quilt as you go" fashion with the seams on the OUTSIDE of the front using a 1/2" seam allowance.

1.  Lay out your front strips in the order you want them be in the finished throw.  You might want to label them 1-12, or just stack them in order.
2.  Pair each backing strip with a front strip WRONG sides together.  You should have 12 pairs.  If you are using a directional backing fabric, make sure your strips are all going in the same direction.

3. Lay out Strip #1 and Strip #2 as shown.  Notice that Strip #1 is wrong sides together with a backing strip, as is Strip #2.  Make sure the left side selveges are even. 
4.  Pick up the pair of strips, placing them together with the backing fabrics face to face.  You should have 4 layers of fabric in this order - Strip #1, backing strip, backing strip, Strip #2.
5.  Sew all 4 layers together from left to right using a 1/2" seam.  Remember - the seam goes on the FRONT!

6.  Open out the sewn strip set and lay out Strip #3.
7.  Grab it the same way, and sew Strip #3 to Strip #2 just like you did before.

8.  Continue adding each strip set unti all 12 strip sets are sewn together.
9.  See how the right side of the throw is all uneven?  That's okay.  You didn't do it wrong.  All fabric widths are different.  We're going to take care of that right now.

Lay your throw on your cutting mat.  Trim off both sides of selvedges to make nice, clean, selvege-free edges.  No need to measure - just trim as straight as you can.
10.  Stitch a 1/2" all the way around the perimeter of the throw to secure all the layers.  You could use a decorative stitch here if you want.

11.  With your sharp scissors, snip all the seam allowances and the outer edge 3/8"-1/2" apart to make the fringe.  Be sure you don't snip the seam line stitching!
12.  Wash, dry, and watch your fringe "bloom"!  I washed mine with a load of towels to help it fringe even more.


Wasn't that easy?  Here's a few helpful hints?
  • Pressing each strip set (front to back, wrong sides together) before sewing will help the fabrics stick together so that there's less shifting as you sew.
  • ALWAYS make sure that you are looking at the newest FRONT SIDE STRIP as you sew.  If the backing fabric is on top, it's a boo-boo and your seam will be on the back instead of the front.

  • Don't have a 1/2" seam allowance marked on the throatplate of your sewing machine?  My not-inexpensive German machine didn't either, so I made a temporary seam guide using two business cards.  Mark a line 1/2" from the edge on one card.  Slip this card under your presser foot and drop the needle down on the line.  Place the second business card next to the one under your needle and tape that card onto the bed of yor machine.  Remove the card under the needle and voila!  Instant (and temporary) seam guide!
 We hope you have enjoyed this tutorial.  You can find all of Peeps (Castle Peeps as well as 1001 Peeps) on our website.

I promised you a Mail Call, so here's the details.  Leave a comment with your favorite Summer Camp memory (or anything else you'd like to share), and we'll pick one winner at random to receive a special care package directly from Lizzy House containing a Fat Quarter set of the 1001 Peeps in the Basra Blue colorway!  Comments will be open until midnight, Thursday, July 21.  I'll return from my own Summer Camp on Monday, July 25th and select and announce a winner.

I'd love to see your project - feel free to post it on our Facebook page!  We love seeing everybody's projects!

Happy Sewing,
Susan

Friday, June 17, 2011

1001 Peeps Summer Camp

Have you seen the new 1001 Peeps fabrics by Lizzy House for Andover yet?  Do you think it's the coolest stuff ever, yet you're not quite sure what to make with it?  We've got the answer for you - 1001 Peeps Summer Camp!

Every Friday for the next 11 weeks, a new Camp Couselor will be sharing a great summer project with you using this fabulous fabric.  I'm so excited to have been asked to participate!  I have a feeling our project is going to be a little bit quilty....a little bit fringey.....and a whole lot of easy.  Just the kind of project you need in the summertime.


Here's the full lineup of Camp Counselors:
June 17:  Sew! Mama! Sew!
June 24:  Alexia Abegg, Craftopia
July 1:  Beth, Lemon Cadet
July 8:  The Fat Quarterly!
July 15:  Moi, The Quilt Asylum 
July 22:  Amanda, MrsMcPorckchop
July 29:  Anne Weil, Flax and Twine
August 5:  Heather Bostic, {House} of alamode
August 12:  Karyn Valino, Make Something
August 19:  Deborah Moebes, Whipstitch
August 26:  Monica Solorio-Snow, The Happy Zombie

Be sure to check the designated blog for each week.  And, if you decide to attend Summer Camp with us, here's a button you can download or drag for your very own!

Oh, and did I mention that there will be giveaways at the camp meetings each week?

P.S.  Today is Lizzy's birthday!  Go say hi!