Welcome back to Part 2 of Math for Quilters!
You've built your blocks. Now it's time to set them all together with sashing, posts, and borders. If you're not familiar with the terminology: sashing is the spacers between the blocks, posts (or cornerstones) are the little squares where the sashing intersects, and borders are the frames around the center of the quilt.
Are you ready for this? Grab a calculator and a cup of coffee!
I've drawn a sample quilt in EQ7.
And here are the sample quilt facts:
Notice that these are FINISHED sizes!
FACT: You MUST add 1/2" to the finished size of any piece in a quilt - block segments, sashings, borders - before you cut any fabric in order to allow for (2) 1/4" seam allowances. This is known as the "cut size", as opposed to the "finished" size".
This table was designed for you, the student, to fill in the numbers based on the quilt picture and the quilt facts. Since you're not working this on paper with a pencil, I have filled in the answers for Finished Size, Quantity, and Cut Size. Compare this chart to the quilt diagram to see how I calculated the answers.
What is the finished width of this quilt? 50"
What is the finished length of this quilt? 63"
Helpful Hint: Remember to SUBTRACT the 1/4" seam allowance as pieces are sewn together when calculating the size of the next piece to be added (especially when calculating borders!).
You now know exactly how big your quilt will be based upon the block, sashing and border sizes you have chosen. You can alter any of these dimensions to make a different sized quilt.
Next week: It's time to shop! How much fabric would you need to buy to make this quilt? I'll show you how to figure that out!
Thursday, March 8, 2012
Monday, March 5, 2012
One Week, One Thing - March 5
My One Week, One Thing pledge continues.
This past week I accomplished both goals I set for myself. The Amish With A Twist (also know as the Black Beast) is bound and hanging in the store behind the checkout counter! It is beautiful, if I may say so myself. We have opened up 12 more slots in this program; if you are interested but haven't signed up yet, we've made room for you!
I also quilted and bound the Four Patch Easy Peasy sample. We haven't cut the kits just yet, but hope to have them cut and packaged up this week. I'll announce in the newsletter when they are ready.
I also took time this week to play with a new block. The "Granny Square" is all the rage on the modern blogs these days; however, the block tutorial has you make this block completely with squares set on point, where you then cut off the edges to square up the block once you are done. However, this method results in bias edges all the way around the block. Not my favorite, and certainly not ideal for the novice quilter. So, since I have been playing with Marti Michell templates, and Set B was used is February's project, I decided to see what I could do.
The block as I made it uses templates B12 for the squares (you can also just cut 2-1/2" squares), B13 for the side setting triangles, and B14 for the corner triangles. If you use the B13 and B14 templates, make sure to change the grainline to the long side of the triangle on B13 and the short side of the triangle on B14. If you don't, you'll have bias edges just like we were trying to avoid! The block measures 9" unfinished (8-1/2" finished). You can also make this block using template Set A and 2" squares - but your finished block will be smaller. I haven't made one yet to check the measurements.
My stepson and his wife are expecting a baby and the shower is in June, so I plan to use this block in a quilt for them. My goal for next week is to get at least the 12 blocks made for this quilt.
And last, but not least, I am still plugging away on my English Paper Pieced Double Diamonds. I have made the half blocks for the top and bottom edges; and have sewn the blocks onto one of the edges.
I hope to get the other edge sewn in tomorrow night at my small group meeting.
I still have to pull fabrics and make the corner blocks, but looking at this photo, I COULD leave them off and have 45 degree corners! Should I add corner blocks to make a square quilt, or leave it 'as is' with an interesting corner treatment? Help me out and vote!!
What One Thing are you going to do next week?
This past week I accomplished both goals I set for myself. The Amish With A Twist (also know as the Black Beast) is bound and hanging in the store behind the checkout counter! It is beautiful, if I may say so myself. We have opened up 12 more slots in this program; if you are interested but haven't signed up yet, we've made room for you!
I also quilted and bound the Four Patch Easy Peasy sample. We haven't cut the kits just yet, but hope to have them cut and packaged up this week. I'll announce in the newsletter when they are ready.
I also took time this week to play with a new block. The "Granny Square" is all the rage on the modern blogs these days; however, the block tutorial has you make this block completely with squares set on point, where you then cut off the edges to square up the block once you are done. However, this method results in bias edges all the way around the block. Not my favorite, and certainly not ideal for the novice quilter. So, since I have been playing with Marti Michell templates, and Set B was used is February's project, I decided to see what I could do.
The block as I made it uses templates B12 for the squares (you can also just cut 2-1/2" squares), B13 for the side setting triangles, and B14 for the corner triangles. If you use the B13 and B14 templates, make sure to change the grainline to the long side of the triangle on B13 and the short side of the triangle on B14. If you don't, you'll have bias edges just like we were trying to avoid! The block measures 9" unfinished (8-1/2" finished). You can also make this block using template Set A and 2" squares - but your finished block will be smaller. I haven't made one yet to check the measurements.
My stepson and his wife are expecting a baby and the shower is in June, so I plan to use this block in a quilt for them. My goal for next week is to get at least the 12 blocks made for this quilt.
And last, but not least, I am still plugging away on my English Paper Pieced Double Diamonds. I have made the half blocks for the top and bottom edges; and have sewn the blocks onto one of the edges.
I hope to get the other edge sewn in tomorrow night at my small group meeting.
I still have to pull fabrics and make the corner blocks, but looking at this photo, I COULD leave them off and have 45 degree corners! Should I add corner blocks to make a square quilt, or leave it 'as is' with an interesting corner treatment? Help me out and vote!!
What One Thing are you going to do next week?
Thursday, March 1, 2012
Thursday Tidbit - Math For Quilters, Part 1
Okay. It seems like there are lot of you who want to see the Thursday Tidbits. I'll begin with a multi-part series on what I call Math for Quilters. This is based on a class I developed back in 2006, and I'm currently covering the material with my staff. We'll start with basic block grids and sizes, and then progress to the math formulas to calculate and cut out a complete quilt. This may seem a bit intense for my first Tidbits, but it's a topic that very near and dear to my heart! PLEASE don't be scared.....I'll hold your hand and walk you through all of it!
I know for many of you, math is a four-letter word. In order for your projects to come out the right size and nice and flat, as well as being able to determine how much fabric to buy, you're gonna have to do a little bit of math. But relax - it's 3rd grade math, not calculus!! Having these formulas in your "toolbox" will allow you the freedom to plan and create any quilt in any size!
Let's start today with quilt blocks.
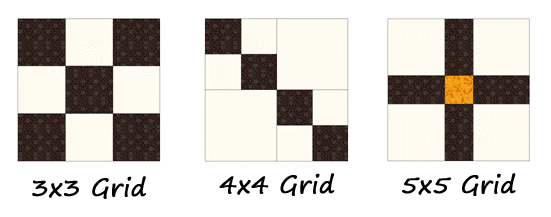
FACT: Most patchwork blocks are based on an evenly divisible grid. Can you visually see the even divisions in these quilt blocks?
When you hear the term "9-patch", this is a clue to the grid base used within the block. A 9-Patch block has nine patches - 3 across by 3 down, hence a 3x3 grid. If you are having trouble "seeing" the even divisions within a block, sketch it out and draw grid lines across it to determine the underlying base grid. In some blocks, the patches may span 2 or more grid spaces or a grid space may be made up of smaller patches, like the 4x4 "Double 4-Patch" block shown above. I don't want to complicate things at this point, but keep in mind that a 9-Patch block (on a 3x3 grid) does not always mean that there are 9 equal squares in the block. The UNITS of the block must equal 9 and be the same size. If you have any questions about this, just ask me!
Can you determine the GRID base for the following blocks?
Once you establish the grid base for your block, you can calculate a finished block size by deciding on a unit size for the grid.
For example, if the black square in the first block is 2" finished, the entire block will finish at 6" (2" x 3 across = 6"). Change that black square to 3", and the finished block size is now 9" (3" x 3 across). Decrease it to 1-1/2" and now it's 4-1/2" finished (1.5" x 3 across).
Can you calculate the block sizes for the rest of the blocks shown above if the grid unit size is 2"? What about 3"? Here's a hint: Determine the underlying grid and multiply by the grid unit size.
Resizing Quilt Blocks
Once you have determined the grid base of a quilt block, you can resize the block by multiplying the grid by a new unit size, or by choosing a new finished size and dividing by the grid to create a new unit.
Huh? For example, look at the following block. The grid = 4x4, the small square = 2", and the finished size = 8".
To resize by the block by changing the Unit Size:
Grid x Unit Size = Block Size
What size will the block finish if the small squares are now 3"?
(Answer: 12" )
To resize by changing the Block Size:
Block Size / Grid = Unit Size
What size is the small square if the block now finished at 6"?
(Answer: 1-1/2")
Is your head spinning yet? Just keep thinking in the grid, and you'll be fine. But blocks are the basis of most quilts, and having the power to create blocks in any size (instead of what your pattern or book tells you) gives you the freedom to create whatever size quilt you want! Isn't that liberating?
If any of this isn't clear, just drop me a comment and I'll try to respond. Next week - calculating quilt sizes!
Rebecca asked on Facebook how to calculate sizes for blocks that don't fit the "square" mold of basic quilt blocks, like Tumblers.
Here's my smart-aleck answer....EQ7. I use Electric Quilt Software to draw basic blocks and rudimentary quilt layouts because it's faster than graph paper and EQ does the math for me. I probably use one-tenth of its total capabilities, but it saves me time and brain cells when I'm drafting a new quilt.
But for Tumblers, here's how you plan a quilt.
The height of the row is easy. It is based on the measurement of the tumbler from top to bottom. Multiply the height by the number of rows to get your finished length measurement.
Here's a diagram showing how to calculate the width of the row (drawn in EQ7, I might add....).
I hope this visual works - because I'm having difficulty describing in words. You can't take the width of the wide part and multiply by the number of total blocks in the row, because the angled part of the block next to it occupies the same "width space". But if you look at the diagram, and measure your finished tumbler as shown, you should get a ballpark measurement of 1 "block" width. You'll have to add on the width of half-blocks to make the edges straight, but you'll get fairly close enough to a finished width of a quilt by using this formula and multiplying by the total number of tumblers in row.
I know for many of you, math is a four-letter word. In order for your projects to come out the right size and nice and flat, as well as being able to determine how much fabric to buy, you're gonna have to do a little bit of math. But relax - it's 3rd grade math, not calculus!! Having these formulas in your "toolbox" will allow you the freedom to plan and create any quilt in any size!
Let's start today with quilt blocks.
FACT: Most patchwork blocks are based on an evenly divisible grid. Can you visually see the even divisions in these quilt blocks?
When you hear the term "9-patch", this is a clue to the grid base used within the block. A 9-Patch block has nine patches - 3 across by 3 down, hence a 3x3 grid. If you are having trouble "seeing" the even divisions within a block, sketch it out and draw grid lines across it to determine the underlying base grid. In some blocks, the patches may span 2 or more grid spaces or a grid space may be made up of smaller patches, like the 4x4 "Double 4-Patch" block shown above. I don't want to complicate things at this point, but keep in mind that a 9-Patch block (on a 3x3 grid) does not always mean that there are 9 equal squares in the block. The UNITS of the block must equal 9 and be the same size. If you have any questions about this, just ask me!
Can you determine the GRID base for the following blocks?
![]() | |
| (1.) 6x6, (2.) 5x5, (3.) 4x4, (4.) 5x5, (5.) 4x4, (6.) 6x6, (7.) 5x5, (8.) 4x4 |
For example, if the black square in the first block is 2" finished, the entire block will finish at 6" (2" x 3 across = 6"). Change that black square to 3", and the finished block size is now 9" (3" x 3 across). Decrease it to 1-1/2" and now it's 4-1/2" finished (1.5" x 3 across).
Can you calculate the block sizes for the rest of the blocks shown above if the grid unit size is 2"? What about 3"? Here's a hint: Determine the underlying grid and multiply by the grid unit size.
Resizing Quilt Blocks
Once you have determined the grid base of a quilt block, you can resize the block by multiplying the grid by a new unit size, or by choosing a new finished size and dividing by the grid to create a new unit.
Huh? For example, look at the following block. The grid = 4x4, the small square = 2", and the finished size = 8".
To resize by the block by changing the Unit Size:
Grid x Unit Size = Block Size
What size will the block finish if the small squares are now 3"?
(Answer: 12" )
To resize by changing the Block Size:
Block Size / Grid = Unit Size
What size is the small square if the block now finished at 6"?
(Answer: 1-1/2")
Is your head spinning yet? Just keep thinking in the grid, and you'll be fine. But blocks are the basis of most quilts, and having the power to create blocks in any size (instead of what your pattern or book tells you) gives you the freedom to create whatever size quilt you want! Isn't that liberating?
If any of this isn't clear, just drop me a comment and I'll try to respond. Next week - calculating quilt sizes!
EDITED 3/5:
Cindy asked if I could provide the grid blocks with the actual grid overlaid on top of them. Please excuse my less than stellar drawing skills - but you should be able to see the blue lines on top of the quilt blocks.Rebecca asked on Facebook how to calculate sizes for blocks that don't fit the "square" mold of basic quilt blocks, like Tumblers.
Here's my smart-aleck answer....EQ7. I use Electric Quilt Software to draw basic blocks and rudimentary quilt layouts because it's faster than graph paper and EQ does the math for me. I probably use one-tenth of its total capabilities, but it saves me time and brain cells when I'm drafting a new quilt.
But for Tumblers, here's how you plan a quilt.
The height of the row is easy. It is based on the measurement of the tumbler from top to bottom. Multiply the height by the number of rows to get your finished length measurement.
Here's a diagram showing how to calculate the width of the row (drawn in EQ7, I might add....).
I hope this visual works - because I'm having difficulty describing in words. You can't take the width of the wide part and multiply by the number of total blocks in the row, because the angled part of the block next to it occupies the same "width space". But if you look at the diagram, and measure your finished tumbler as shown, you should get a ballpark measurement of 1 "block" width. You'll have to add on the width of half-blocks to make the edges straight, but you'll get fairly close enough to a finished width of a quilt by using this formula and multiplying by the total number of tumblers in row.
Subscribe to:
Posts (Atom)