I am currently working on a sample for the store using this pattern
and this fabric.
The basic block calls for what I call "connector corners" or "flip and sew corners" - where you lay a square across a block and sew the diagonal, trim the corner, and flip the remaining triangle up...like this.
There are 42 blocks in this quilt (using the entire layer cake), and each block calls for 8 connector corners. The pattern says to draw a diagonal sewing line across each square. I quickly did the math... 42 blocks times 8 corners equals 336 lines! I don't know about you, but that would take me a lot of time! I much rather be sewing than marking lines!
The Angler 2 Tool to my rescue!!
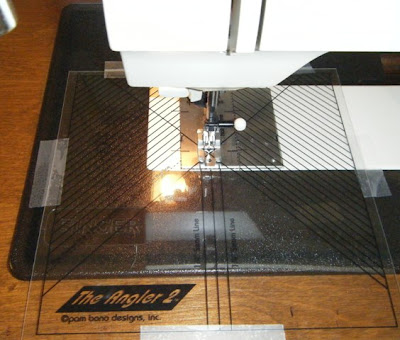
This handy-dandy plastic template sits over the throatplate of your sewing machine and you can use the lines on the tool as a fabric guide instead of actually marking lines. Here's how it works.
Inside the package is a plastic template. The template is made up of a "key" and its surround.
You have to cut the "key" away from the surround on the dotted lines as instructed. Here's a closeup of the "key".
See that little circle that says "Punch needle hole here"? Place the key under your presser foot, and lower the needle directly into that hole.
Make sure your "key" template is sitting straight on the throatplate and lower the presser foot to hold it in place, making sure the needle is still in the down position in the hole.
Now, take the template "surround" that you cut away from the "key" and place it on the bed of your machine, snugging it right up to the cut lines of the "key" template.
Tape the "surround" to the bed of your machine. I would usually use painter's or masking tape for this, but I have a teenager in the house who "borrows" things and all I could find was scotch tape! Can you see how the lines of the "surround" completely match up to the lines on the "key"?
After the "surround" template is secured to your machine, raise the presser foot and the needle and remove the "key" template.
Place the "key" template back in the package! You must make sure not to lose this piece! You will need it every time that you attach the Angler to your machine! In fact, I put all of the parts into a larger ziploc bag so that nothing gets misplaced.
Now you are ready to sew those pesky diagonal lines!
Place your square on the corner of the fabric or block that you are attaching it to, matching up corners and sides. You can pin the square in place if you wish. Place the square in front of the needle, matching the top corner with the needle line, and the bottom corner with the center line on the tool.
Begin sewing, keeping the bottom corner lined up with the center line on the template.
Continue sewing across the square, and "eyeball" the last bit to the corner once your square moves off the template.
You can chain piece as many corners as you need to. Just pick up the next one, line it up in front of the needle, align the bottom corner with the template line, and sew!
It's that easy! Nice, straight diagonal lines with no marking!
If you look closely at the template, there are lines 1/4" on either side of the center line. You can use these lines if you are making half squares and sewing on both sides of diagonal.
The tool comes with complete printed directions. It's a life saver for this type of task!
The quilt is all finished now - isn't it cute? You can get one for yourself here.


3 comments:
Cool Tool!
you should submit this to a quilt magazine for publication or to the anler manufacturer. These are really good directions!
Is this quilt for sale?
Post a Comment