I'd like to make a few things clear up front:
- This is how I do my double fold binding. It is by no means the only way to do it. If you have another method that works for you, that's great!
- I stitch my binding down by machine. I will be showing you how to do it that way. If you wish to finish your binding by hand, I'll tell you the differences in this tutorial.
- I cut my binding strips cross-grain (i.e., width of fabric). Unless I am binding a curved edge, I don't make bias binding.
- There are a lot of pictures in this tutorial. I may get a little bit wordy, but I can't help it!
- Measure the 4 sides of your quilt. Add them all up and divide by 40 (the usable width of fabric).
- Round up the number you get to a whole number. This is the number of strips you will need to cut.
**Sidebar: How wide to cut the strips? I've known quilters to cut their binding strips as small as 2" to as big as 3". Personally, I use a very thin batting and trim my quilt right up to the edge. Therefore, I cut 2-1/8" strips. The general ballpark is usually 2-1/4" to 2-1/2". Try different widths to see which one you like best.
Cut your strips and trim off the selveges.
Open up one strip and mark a 45 degree line as shown.
Can you see the drawn line?
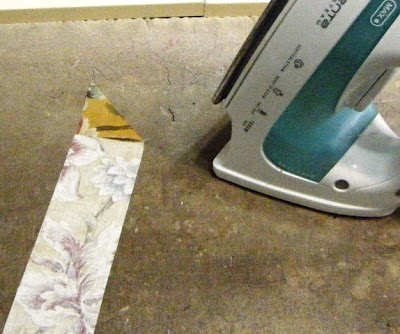
I could draw a 45 degree line just like this one on the rest of the strips (for the mitered joins), but I'm lazy. I take the remaining strips to my ironing board, and press the 45 degree line. Make sure your fold goes from upper right to lower left.
See the crease?
For purposes of this tutorial, I am going to call the end of the strip with either the marked line or the creased line the "head" of the strip and the other end the "tail" of the strip. Stick with me on this......
Begin with the strip that has the marked line (Strip #1). Pin a creased "head" strip (Strip #2) to the "tail" of the marked strip (Strip #1) at a 90 degree angle right sides together. Make sure the angle lines up just like this.
Sew the strips together using the diagonal crease as your guide.
Now, cut the chain apart, trimming each miter seam leaving an approximate 1/4" seam allowance. I use scissors for this. Remember, I'm lazy! I see no reason to get up from my chair and use a rotary cutter and ruler. Just "free eye" that 1/4"!
After all the seams are trimmed, go to the ironing board. Beginning with the marked "head", press the strips in half lengthwise.
When you get to a join, press the seam open and continue pressing the strip in half lengthwise.
When you finish pressing the entire binding strip, you should be at the "tail" end of the strip. Flip it over so that the raw edges are on the left, and accordian fold it. You should end with the marked "head" on top.
Time to go back to the machine. I am fortunate that my cutting table sits right behind my sewing chair. I place the accordian-folded binding on the table behind me and feed my binding over my right shoulder. If I am sewing in a different environment, I will actually place the folded binding on my right shoulder. This allows the binding to feed through the machine without getting tangled up in the wad of quilt in my lap. Sorry, no photos of this step. My cats don't have opposable thumbs.
As stated previously, I finish my binding by machine. Therefore, I attach my binding to back side of the quilt (and topstitch on the front). THIS IS HOW MY PHOTOS WILL PROCEED! If you opt to hand-stitch your binding down, reverse this process. Stitch your binding to the FRONT of your quilt and hand-stitch to the back side.
Place two pins in the edge of your quilt, approximately 12" - 18" apart. This is the gap you will need to join the final "head" and "tail" once you sew all the way around your quilt.
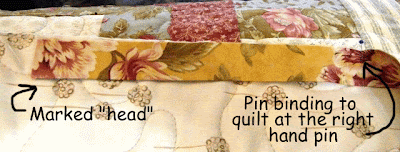
Place the marked "head" of your binding in the center of this gap. See that pin head on the far right? Go ahead and pin the binding strip to the quilt to hold it in place. This is where you are going to start sewing.
Place the quilt under the presser foot at the pin holding the binding strip. Remove the pin and begin sewing with a 1/4" seam.
Stop sewing 1/4" before you get to the corner of the quilt. I am fortunate that my 1/4" foot has a 1/4" mark in front of the needle hole (the little red mark). I can feel the edge of the quilt when it lines up with those marks. If your foot is not marked like mine, you can place a pin perpendicular to the presser foot at the 1/4" mark. When you stop sewing, make sure your needle is in the "down" position.
Raise your presser foot, and pivot the quilt 45 degrees.
Put your presser foot back down and sew off the quilt. Do not cut the thread. This photo shows the 45 degree sewn line.
With the thread still attached, turn the quilt so that you are ready to sew down the next side. Fold the binding strip straight up, making a 45 degree fold. I apologize for the goofy photo - I needed 3 hands!
Now fold the binding straight down, aligning the upper fold with the upper edge of the quilt. This is what creates the mitered corners of your binding.
Place the quilt back under the presser foot and begin sewing from the edge with 1/4" seam.
When you have completed the 4th corner, sew until you reach the left hand pin you placed at your "gap". Stop sewing and cut the thread.
With the quilt in your lap or on your sewing table, pin the "tail" end of the binding to the edge of the quilt. Lay the "head" end with the marking on top. Open up the marked "head" end and cut the "tail" end about an inch to the right of the marking. This removes the excess tail and gets it out of the way so that we can join these two ends together. I use my scissors for this cut; it does not have to be precise.
See where I cut the tail off?
Make sure the "tail" end is pinned smoothly to the quilt. Lay the "head" piece on top, making sure it is straight and flat, and make a mark on the "tail" piece at the edge of the "head" piece.
Unpin everything. Place the "head" piece with the marked line on top of the "tail" piece, right sides together, at a 90 degree angle. Make sure the bottom edge of the "head" piece lines up with the mark on the "tail" piece. I placed a pin on the "tail" mark in the lower left corner for demonstration purposes.
Fold the unsewn portion of the quilt so that you can place the pinned binding join under your presser foot. Sew the join on the marked line.
Cut the threads, and trim the 1/4" seam allowance with scissors. Finger press the seam open.
Refold the binding in half along the pressed crease and pin to the edge of the quilt. If everything was smooth and flat when you marked where to join your binding, everything should be flat and smooth now.
Finish sewing the binding to the quilt, beginning where you stopped and ending where you started.
Now it's time finish sewing the binding to cover the raw edge of the quilt. If you are sewing by hand, you're done at the machine. If you're like me, it's time to sew some more!
Turn your quilt over so that the front of the quilt is right side up. Pick a spot on any side and fold the binding from the back to the front, covering the stitching. Place a pin to hold the binding initially in place.
Begin sewing about an inch in front of the pin. Leaving the pin in place behind your foot ensures that your binding is straight and neat when you begin sewing. ** I have attached my open toe applique foot so that I can show you more detail. This is not necessary; I normally use my regular 1/4" foot for this step.
Begin sewing as if you are top stitching. In theory, the stitching on the back side of your quilt should be right up against the binding on the back. Mine gets pretty close; but is rarely perfect. I don't sweat the small stuff. If you find that your stitching is really far away from the binding on the back, your strips may be too big. If you find that you can't cover the previous stitching on the front without sewing into the binding on the back, your strips may be cut too small. It's a process..... Keep trying different strip widths to find what works for you.
When you get about an inch or so from the corner, stop sewing with your needle down. Place a pin to hold the vertical line of your binding in place.
Fold up the horizontal edge of your binding, creating a mitered corner. You may have to fiddle with the fold to get the miter folded nicely.
Continue sewing until you have taken one stitch into the bottom fold.
With your needle in the down position, raise your presser foot and pivot the quilt to continue sewing.
Here's a photo of a finished corner.
Repeat with the next 3 corners and continue sewing to the place where you started, sewing about a 1/2" past where you started. You can backstitch if you wish.
And you're done! That wasn't too hard, was it?
Happy Binding!!!


6 comments:
Thanks for sharing, I think this is a great tutorial! I am still learning to quilt and your instructions were easy for a beginner like myself to follow and understand. Thanks again!
I love this... I always have trouble.. Never knew how not to overlap at the end... THanks so much...
Oh Tilly, that was a great tutorial. I do my bindings like that except for the 'sewing off the corner' like you do. It sure makes a nicer corner..
Jean
This is an excellent tutorial. I was visiting a friend from far away, and didn't have time to show her how. I will forward this to her, instead. Thank you.
Thank you so much for the lesson. Your instructions make it so even I can understand how to do this and not feel "dumb" trying it. THUMBS UP!!
I use an empty toilet paper roll to wind all my binding as I sew the strips together.
Post a Comment